In the beginning
Once upon a time, websites were simple text files that used tags: <html> to tell a browser how to display text. Then, things got more complicated with the emergence of .css files that would tell the browser how to style the text marked up with the relevant tags. Headers should be displayed like this; bullets like that. Then, javascript files (.js) could be used to mark up the text files so that the browser would know how to do various kinds of interactivity or special effects.
Then things started getting really complicated, including generating a website dynamically with content from a database. In fact, I lost my first project here at Carleton University because the website I built to handle user-generated submissions wasn’t secure: a webform on the site could have malicious code put into it which, when saved to my database, caused the database to execute spam.
Which brings me to the idea of a ‘static’ site. The simple idea is, we return to the way the web used to work: a stack of files that do not connect to a database etc when the user visits the website. Instead, the website is built once on my own computer and then those complete html pages are what the visitor sees. If you’ve ever used Squarespace or Wordpress to host a website, this is emphatically not all that! Those services use several layers of interface to store your writing in their databases and to only build and serve your site when someone visits it. Static sites therefore can be more secure and easier for you to control. For public archaeology or history, or for communicating the results of a research project, static sites are ideal (they are also easier to archive, because you can deposit all of the files in a digital archive and a person will not need anything fancy to view them again).
A static site doesn’t mean you can’t have a way of managing your content and your images etc; it just means that these are on your own computer. The only thing that ever gets exposed to the web are the finished html pages. There are a variety of ways of putting those finished html online. You could have your own webspace and you just use some kind of file transfer to put them there. You can use a special modification of a github repository. You can use Netlify’s ‘drop’ feature. You could use similar services from elsewhere.
Static Site Generators
If you search for the phrase ‘static site generator’, you will find a lot of ’engines’ that you can install to do it. You’ll encounter something called Jekyll, or Hugo, or Ghost. These are all fine, but can get very complicated very quickly. Some generators require a language called ‘Go’, others ‘Ruby’, and so on. This can lead to dependency hell, so you have to make sure to set things up carefully. And frankly, I loathe Jekyll.
We’re going to use a generator called ‘Pelican’ because it uses Python, which we’ve already installed. We’re going to use our workbench here - the ability to write Markdown - as the environment for writing our content. But to build the site, you’re going to use a feature of Jupyter Desktop that we haven’t explored yet, the console.
The Console aka Terminal
The console is a way of interacting with your computer through text commands. We’re going to execute some pip commands to get the Pelican site generator installed.
To open the terminal, click on the + button at the top left of the JupyterLab Desktop interface (ie, our workbench); this will open JupyterLab Desktop’s ’launcher’. Click on the ’terminal’ icon. You should now have a new tab open that looks like this:

When you are working in the terminal, you type commands at the ‘prompt’, which here looks like ‘%’ (in other settings, it can look like $ or >). When you type in a command and hit enter, the computer looks through all of the commands it knows and tries to execute the command when it finds it. Then it will return any output. This can mean that a command that results in no output can run successfully, but the only indication of this that you will receive will be just a new %, so be aware of that.
Let’s run a test command. The convention for showing you a command will be to write it like this: % command. You don’t type the % ok? Now try this, at the terminal prompt:
% pwd
This command stands for ‘Print Working Directory’. It should give you the path or sequence of folder/subfolder/sub-subfolder etc where the terminal is currently working in. In our case, it should end with /week-10.
If you typed % python --version what do you think would result?
There are a lot of commands that you enter and even string together so that the output of one command becomes the input of another. We won’t be doing much (or any) of that here in this course, but it’s good to be aware of. Some other basic commands:
% cd -> this command ‘Changes Directory’ and can be used to move up or down the sequence of folders/subfolders.
% cat <name-of-a-file.extension> will show you to contents of a file (it ‘conCATenates’ the file’s content to the terminal.)
% ls will LiSt the contents of a folder.
Install Pelican
We’re going to install Pelican now. At the command prompt:
% python -m pip install "pelican[markdown]" --ignore-installed blinker
You might get some warnings, but those can be ignored. Now we’ll add a plugin that will allow us to use the wikilink syntax for markdown to create links between pages:
% pip install minchin.pelican.plugins.wikilinks
We’re eventually going to use Github’s ‘Pages’ feature to make this website live on the web. Github uses Jekyll to build a website for us, but we don’t want that, so we’ll add a plugin to our site that will add the necessary code to our finished site to tell Github not to do that.
% pip install minchin.pelican.plugins.nojekyll
Configure Your Site
We’re ready to go. We’re going to run the first command that will generate all of the necessary files and some basic configuration to get our site up and running:
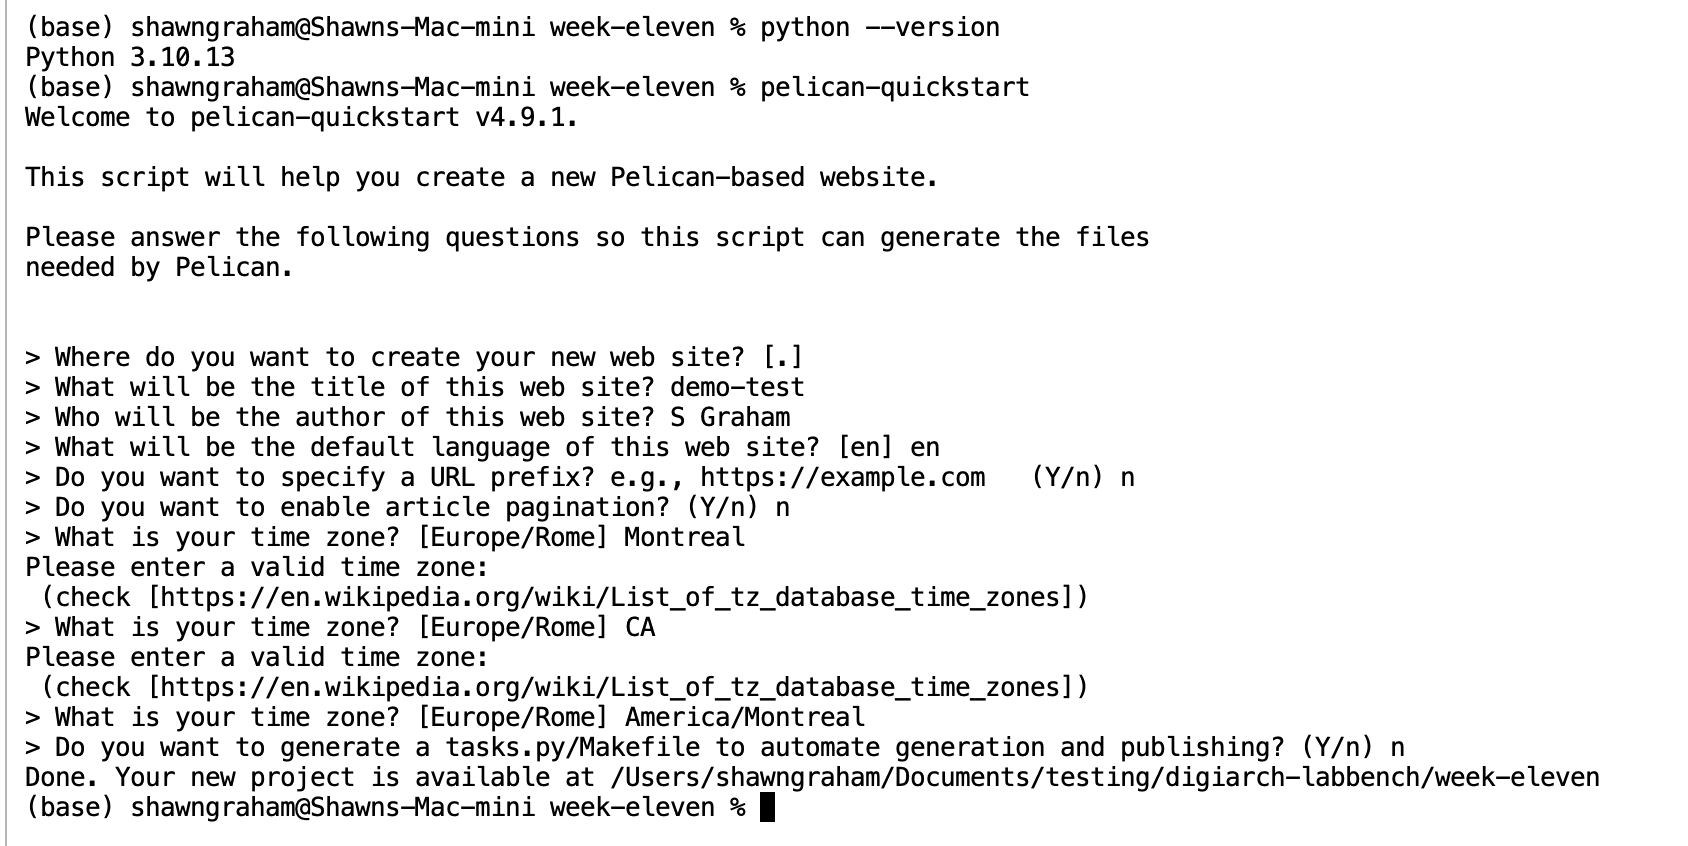
% pelican-quickstart
This command will ask you a series of questions; answer them the way I have below (of course, you’re the author of the site). The answer to the first question will also suggest the answer [.]; hit enter to accept it (the dot means, ‘right here’). Then proceed to answer the rest of the questions appropriately.
> Where do you want to create your new web site? [.]
> What will be the title of this web site? demo-test
> Who will be the author of this web site? S Graham
> What will be the default language of this web site? [en] en
> Do you want to specify a URL prefix? e.g., https://example.com   (Y/n) n
> Do you want to enable article pagination? (Y/n) n
> What is your time zone? [Europe/Rome] Montreal
Please enter a valid time zone:
 (check [https://en.wikipedia.org/wiki/List_of_tz_database_time_zones])
> What is your time zone? [Europe/Rome] CA
Please enter a valid time zone:
 (check [https://en.wikipedia.org/wiki/List_of_tz_database_time_zones])
> What is your time zone? [Europe/Rome] America/Montreal
> Do you want to generate a tasks.py/Makefile to automate generation and publishing? (Y/n) n
Add Some Content
Notice now that you have a subfolder in your week-10 folder called ‘content’, and another one called ‘output’. Let’s give your new website some content!
Double-click on the /content folder. Then, using the launcher (the +), create a new markdown file. Call it 2025_07_16_first-article.md (or modify for today’s date; putting the date in the title helps keep things sorted and organized on your computer). Here’s what should go in it:
Title: My First Article
Date: 2025-07-16 10:44
Category: getting-started

# Look I made a website!

Welp, here goes nuthin'!

+ this is a bullet point

Here's a [link to an external webpage](https://example.com).
The first three lines of this file are its metadata for ‘Title’, ‘Date’, and ‘Category’. The site generator uses that information to figure out how to format the look and feel of the eventual webpage, the patterns for the URLs, the use of tags and so on. Save that file.
Go back to the terminal. We’re going to re-build the website now with your new content, but first we have to clean up a hidden folder (you know it’s hidden because it uses a dot at the start of the file name, and your Finder or Explorer on your machine won’t show it to you by default as a result) that JupyterLab Desktop made in your ‘content’ folder when you saved your content (nb, this is just because we’re writing our stuff here. If you were using a text editor like Sublime Text or Notepad++ you wouldn’t have a hidden folder and so wouldn’t need to run the rm command).
% rm -rf content/.ipynb_checkpoints
% pelican
The first line, after you hit ’enter’, ReMoves the hidden subfolder at content/.ipynb_checkpoints. Then the % appears, because there is no default confirmation message when the rm command runs successfully. The next command, pelican tells the site generator to read all of the markdown files in the /content folder, parse them to turn them into html, and write the output to the /output folder. If you double-click on ‘output’ in our file tray, you’ll see all of the pieces of your site!
Serve Your Site
A ‘server’ is a special piece of software that understands how to make a website available to a webbrowser. We also call a dedicated computer that has this sole task as a ‘server’. Python has a server built into it, so we’re going to now run the server so we can see the website in your browser. At the terminal:
python -m http.server 5001 --directory output
This says, ‘hey python! Use your module called http.server to show us the website in the output directory on channel 5001. In your webbrowser (chrome, firefox, safari, edge, etc), put this url into the browser: localhost:5001 or this equivalent: http://127.0.0.1:5001/. This tells your browser NOT to go on the web, but to listen to the local computer (your computer) for any web signals being broadcast on port (channel) 5001. In the terminal, you’ll see this kind of thing:
When you click on a link, you’ll see the hidden commands that the browser is sending to the server to GET new content. Neat eh?
To stop this, hit ctrl+c to exit.
Pick a better theme
Pretty ugly though, eh? If you search on Github or elsewhere for ‘pelican themes’, you might find something interesting. For instance, there’s a theme called Alchemy which looks nice; I also like the Flex theme. If you go to either of those, you’ll see that they’re hosted on Github. Under the green ‘code’ button there’s a ‘Download Zip’ link. You can right-click and ‘copy link’. Then, you can use the curl command with the -LJO flag to download the theme folder, like so:
% curl -LJO https://github.com/nairobilug/pelican-alchemy/archive/refs/heads/master.zip
% unzip pelican-alchemy-master.zip
Then, double click on pelicanconf and change it to point to the new theme:
AUTHOR = "your name"
SITENAME = "Pelican Collection Demo"
SITEURL = ""

THEME = "pelican-alchemy/master/alchemy"
Things you can add to the pelicanconf.py file to style your site more nicely: see its settings page.
Then, remember to type % pelican to rebuild your site, and then serve it to see how it looks. Experiment with different themes. Try making a website that documents your adventures in the field during the graveyard project portion of the course.
There are other static site generators out there. One common one that uses Python as well is mkdocs.
Putting it online
You have some options here to try.
Option 1: Netlify Drop Go to that website, and drag and drop the output folder created by Pelican. Netlify will make a URL and provide hosting for your site for one hour. If you like what you see, you can sign up for a free account and change the url to something more sensible and make it available on the web for all.
Option 2: Github Pages. When signed into Github, go to your account (ie, in my case, github.com/shawngraham) and hit the + to create a new repository.
- Give it a name;
- make it public;
- initialize it with a readme.
- Then hit the
add filebutton,upload filesand select everything inside youroutputfolder. - Once those files are uploaded, hit the green commit button.
Then, click on the cogwheel icon for settings (across the top; not the one beside ‘About’).
- click on ‘pages’
- Under ‘Build and Deployment’, where it says ‘Source’ make sure it says ‘Deploy from a branch’.
- Where it says ‘Branch’, hit the drop down and change it to say ‘main’. Hit ‘save’.
- Wait. Go get a coffee. Come back in five minutes.
- REFRESH the page (ie, reload it. Hit ctrl+r).
- The direct URL to your site will be displayed. Click that: congratulations, you’ve built a website!
Going Further:Make A Collections Site
There are static site builders out there meant expressly for putting cultural heritage materials online with appropriate metadata. I made a site to showcase past student MA and PhD theses with a tool called Collection Builder. So will you.
They use a different approach to what we’ve just done. With Pelican, you had the engine on your own machine. With Collection Builder, they use a special file called a ‘workflow’ that tells Github Pages how to use their templates to transform a CSV file of metadata into a site. I want you to follow their tutorial using their metadata and assets.
Then, I want you to ADD your own materials to the site you build with collection builder. Showcase some of the things you’ve done in this class. Then, document the work of expanding the Collection Builder this way, and add that documentation to your weekly repository logs, and share the URL with me. See how much you can customize for yourself.